
Practice Free MB-280 Exam Online Questions
HOTSPOT
A sales manager wants to set up goals for all salespeople. The goal measurement is based on the total outgoing calls finished each year. The goals for the fiscal year are based on a calendar year
(January – December).
You need to create the rollup query for the goal metrics.
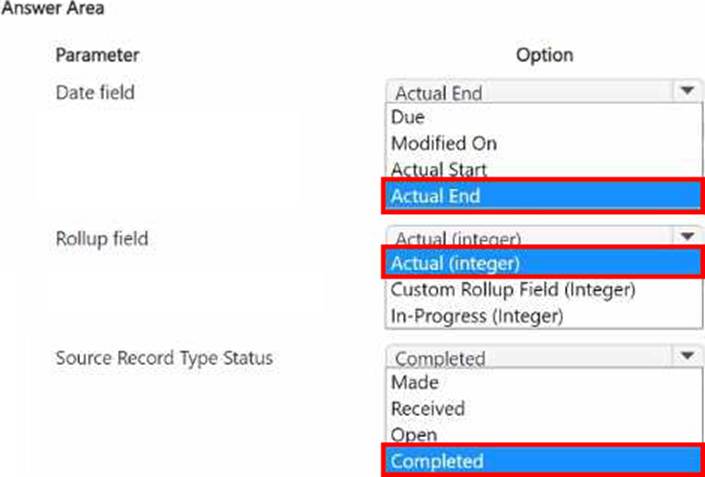
Which option should you select? To answer, select the appropriate options in the answer area. NOTE: Each correct selection is worth one point.

Explanation:
Date Field – Actual End:
The Actual End date field is typically used to mark when an activity, such as an outgoing call, is completed. Since the sales manager wants to measure completed outgoing calls, using Actual End ensures that only calls finished within the fiscal year are included in the goal measurement.
This setting will align with the requirement to track activities finished within a specific time frame (January – December).
Reference: Microsoft Documentation – Configure Goal Metrics and Rollup Fields Rollup Field – Actual (integer):
The Actual (integer) rollup field is suitable for counting the total number of completed outgoing calls. This setting ensures that each completed call is tallied accurately, providing a straightforward measure of the sales team’s activity in terms of call volume.
Using an integer type for the rollup field is appropriate for count-based metrics like this.
Reference: Microsoft Documentation – Define Rollup Fields for Goals Source Record Type Status – Completed:
The Completed status ensures that only calls marked as completed are counted towards the goal. This is crucial for measuring finished activities, as it excludes calls that may still be in progress or have other statuses.
Setting the source record type status to Completed aligns with the requirement to measure only outgoing calls that have been fully executed.
Reference: Microsoft Documentation – Goal Management with Status Filtering
By selecting Actual End as the date field, Actual (integer) for the rollup field, and Completed for the source record type status, you ensure that the goal measurement accurately reflects completed outgoing calls within the specified calendar year timeframe.
HOTSPOT
A company is using Dynamics 365 Sales to track their sales pipeline.
Sales managers require their forecasting to include reasons why opportunities were lost, including losses to competitors.
You need to configure the sales process WITHOUT using custom code.
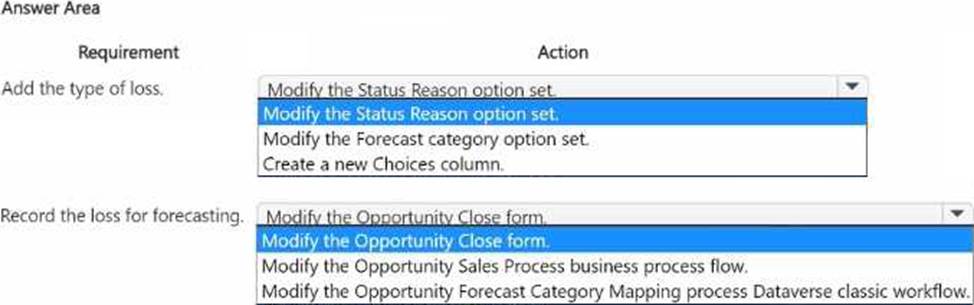
What should you do? To answer, select the appropriate options in the answer area. NOTE: Each correct selection is worth one point.

Explanation:
Requirement: Add the Type of Loss
To track reasons for lost opportunities, including specifics like losses to competitors, you need to provide additional details on why an opportunity was closed as lost.
The Status Reason field can be customized to include specific reasons for the loss. This field is used within the context of the Opportunity entity and allows the addition of options to detail specific loss types.
By modifying the Status Reason option set, you can add various reasons (like "Lost to Competitor") which will appear as options when closing an opportunity as lost.
Reference: Microsoft Documentation – Customize Status Reasons for Opportunities Steps to Modify the Status Reason Option Set:
Go to Settings > Customizations > Customize the System.
Locate the Opportunity entity and open its Fields section.
Find and select the statuscode (Status Reason) field.
Add new options to represent specific loss types and save the changes.
Publish the customization to make the new Status Reason options available for users.
Requirement: Record the Loss for Forecasting
Sales managers need to include lost opportunities and their reasons in forecasting. To ensure that this information is captured accurately, modifying the Opportunity Close form will allow users to specify details when marking an opportunity as closed (won or lost).
By customizing the Opportunity Close form, you can include fields that capture detailed information required for forecasting, such as the type of loss and any competitor information. This ensures that loss details are available for analysis and forecasting without needing custom code.
Reference: Microsoft Documentation – Customize Opportunity Close Experience in Dynamics 365
Steps to Modify the Opportunity Close Form:
In the Sales Hub, navigate to App Settings > Close Opportunity Experience.
Customize the Opportunity Close form to include fields that are relevant to capturing loss information, such as adding fields for competitors or reasons.
Save and publish the form to reflect the changes.
By modifying the Status Reason option set and customizing the Opportunity Close form, you enable the sales team to record detailed reasons for lost opportunities, which will support accurate forecasting and analysis, all without using custom code.
You are a Dynamics 365 Sales administrator. You configure a forecast template that uses the Forecast category as a starting point for a layout for the sales team. The sales manager wants the value of the Lost column to come from the Total Detail Amount instead of the default value because the revenue is always driven by the items. You need to make the change.
What should you do?
- A . Edit the existing forecast and update the Amount column in the layout.
- B . Edit the existing forecast, remove the Lost column, and add a new calculated column.
- C . Create a new forecast and update the Amount column in the layout.
- D . Create a new forecast, remove the Lost column, and add a new calculated column.
A
Explanation:
Since the sales manager wants the Lost column in the forecast to reflect the Total Detail Amount, which is item-driven, you should update the Amount column in the existing forecast layout.
By editing the existing forecast and changing the source for the Amount column to the Total Detail Amount, you can ensure the forecast accurately reflects item-based revenue calculations without needing to create a new forecast or add calculated columns.
Reference: Microsoft Documentation – Configure Forecasts in Dynamics 365 Sales
A company is using Dynamics 365 Sales to provide quotes to their customers.
Preferred customers must be granted a separate flat rate discount on specific products, depending on their countries or regions.
What should you create?
- A . A discount list for Preferred Customers.
- B . A sequence command step.
- C . A product bundle for each country/region.
- D . A price list for the currency of each country/region.
A
Explanation:
Understanding the Requirement:
The company needs to apply a separate flat rate discount for preferred customers on specific products. This discount varies depending on the customer’s country or region.
A Discount List in Dynamics 365 Sales is used to apply specific discounts on products under defined
conditions.
Solution – Creating a Discount List:
A Discount List can be tailored to preferred customers and configured to apply discounts based on specific products and customer attributes, such as their country or region.
Using a Discount List ensures flexibility and control over the discount structure, allowing the organization to manage regional variations in pricing for preferred customers.
Reference: Microsoft Documentation – Configure Discount Lists in Dynamics 365
Steps to Create a Discount List for Preferred Customers:
Navigate to Settings > Product Catalog > Discount Lists.
Create a new Discount List and specify criteria for preferred customers.
Add discount values for the specific products and set conditions based on regions or countries as needed.
Save and publish the Discount List for it to be available for quotes.
By using a Discount List, the company can apply specific discounts to preferred customers while taking into account regional pricing variations, providing a tailored and efficient solution for quote management.
You need to configure search to ensure the administrators can find all records which reference Corgis.
Which action must you perform?
- A . Within system settings, select up to 10 relevant tables.
- B . Within the solution, ensure all relevant tables are indexed.
- C . For all relevant tables, ensure that the Can enable sync to external search index setting is False.
- D . Add columns to be searched to the Lookup view for each relevant table.
B
Explanation:
To enable comprehensive search capabilities for administrators to find all records referencing specific terms (such as “Corgis”), it is essential to ensure that all relevant tables are indexed.
In Dynamics 365, configuring search functionality for specific tables involves setting up the tables to be searchable, which can be done by indexing them within the solution.
Indexing relevant tables makes them accessible in the search feature and ensures all fields within those tables can be searched, allowing for quick retrieval of records that reference specific terms.
System settings (Option A) is limited to selecting up to 10 tables and is more about quick search rather than full indexing. The sync to external search index setting (Option C) is for integration with external search tools and does not directly impact internal search capabilities.
Adding columns to the Lookup view (Option D) affects how lookups work but does not influence full-text search results.
Reference from Microsoft Documentation:
For configuring search indexing, refer to Configure relevance search in Dynamics 365 for more information on indexing tables to enhance search capabilities.
A company’s IT department has a .CSV file stored on one of their Shared Documents folders within their Microsoft SharePoint sites. The data from the .CSV file is ingested into Dynamics 365 Customer Insights – Data.
The file contains a row header and columns of different types, such as quantities and prices. The file also contains some rows with a high proportion of nulls.
You need to clean and transform the data in Customer Insights – Data to be ready for unification.
Solution: Transform the first row to be used as headers. Define column types to be appropriate field types and name the query. Create a full name and full address columns by merging the appropriate columns if they exist. Select Next and your data is now ready for unification.
Does this meet the goal?
- A . Yes
- B . No
B
Explanation:
This solution also includes transforming headers and defining column types, along with creating merged columns. However, it still does not remove rows with a high proportion of nulls. Addressing null values is important for data quality and ensuring accurate unification.
Without removing rows with many nulls, the data may still have integrity issues that could impact the unification process. As a result, this solution does not completely meet the goal.
You use business process flows for all Dynamics 365 opportunities. Some opportunities are closed before business process flow durations are calculated. You need to ensure that business process flow duration values are calculated.
Solution: Change the opportunity to an inactive state.
Does this meet the goal?
- A . Yes
- B . No
A
Explanation:
Changing the opportunity to an inactive state allows for the calculation of business process flow duration values, as this state transition prompts the system to finalize any duration metrics associated with the process flow.
Business process flows calculate duration upon completion or transition of the process, so marking the opportunity as inactive triggers the system to calculate these durations.
DRAG DROP
You need to configure a new Customer Insights – Journeys form to satisfy the digital sales team lead’s request.
Which five required actions should you perform in sequence? To answer, move the five appropriate actions from the list of actions to the answer area. Arrange the five actions in the correct order.

Here’s the correct sequence to configure a new Customer Insights – Journeys form to handle lead duplicates automatically, as per the requirements:
Create a new form:
Start by creating a new form within Customer Insights – Journeys. This is the initial step to set up a form that will capture new leads.
Select a form template:
Choose a template that best fits the purpose of the form. This provides a structure for the form fields and layout, streamlining the setup process.
Set the form target audience to leads:
Since the form will be capturing lead information, specify that the form’s target audience is “leads.” This will ensure that the data is processed and stored as lead records.
Set the form duplicate records strategy to the audience default strategy:
Define how duplicate records are managed. First, apply the default duplicate record strategy for leads. This sets an initial strategy for managing duplicates.
Publish the form:
After completing the setup and configuring the necessary options, publish the form to make it available for use.
Additional Context:
The Create a custom matching strategy and Set the form duplicate records strategy to the custom form matching strategy steps are optional and can be used for further refinement if the default strategy does not meet specific requirements for matching leads based on certain criteria.
By following these steps, you ensure the form is configured for capturing leads and manages duplicates effectively based on the default duplicate record strategy.
Microsoft Dynamics 365
Reference: Set up a Customer Insights – Journeys form
Duplicate Detection Rules in Dynamics 365
DRAG DROP
You need to configure a new Customer Insights – Journeys form to satisfy the digital sales team lead’s request.
Which five required actions should you perform in sequence? To answer, move the five appropriate actions from the list of actions to the answer area. Arrange the five actions in the correct order.
Here’s the correct sequence to configure a new Customer Insights – Journeys form to handle lead duplicates automatically, as per the requirements:
Create a new form:
Start by creating a new form within Customer Insights – Journeys. This is the initial step to set up a form that will capture new leads.
Select a form template:
Choose a template that best fits the purpose of the form. This provides a structure for the form fields and layout, streamlining the setup process.
Set the form target audience to leads:
Since the form will be capturing lead information, specify that the form’s target audience is “leads.” This will ensure that the data is processed and stored as lead records.
Set the form duplicate records strategy to the audience default strategy:
Define how duplicate records are managed. First, apply the default duplicate record strategy for leads. This sets an initial strategy for managing duplicates.
Publish the form:
After completing the setup and configuring the necessary options, publish the form to make it available for use.
Additional Context:
The Create a custom matching strategy and Set the form duplicate records strategy to the custom form matching strategy steps are optional and can be used for further refinement if the default strategy does not meet specific requirements for matching leads based on certain criteria.
By following these steps, you ensure the form is configured for capturing leads and manages duplicates effectively based on the default duplicate record strategy.
Microsoft Dynamics 365
Reference: Set up a Customer Insights – Journeys form
Duplicate Detection Rules in Dynamics 365