
Practice Free CPC-SEN Exam Online Questions
Which tool configures the user object that will be used during the installation of the PSM for SSH component?
- A . CreateUserPass
- B . CreateCredFile
- C . ConfigureCredFile
- D . ConfigureUserPass
B
Explanation:
The tool used to configure the user object for the installation of the PSM for SSH component is CreateCredFile. This tool is responsible for creating a credentials file that stores the necessary user details required during the installation process, ensuring secure and correct authentication.
Reference: CyberArk Privilege Cloud Introduction
How should you configure PSM for SSH to support load balancing?
- A . by using a network load balancer
- B . in PVWA > Options > PSM for SSH Proxy > Servers
- C . in PVWA > Options > PSM for SSH Proxy > Servers > VIP
- D . by editing sshd.config on the all the PSM for SSH servers
A
Explanation:
To support load balancing for PSM for SSH, the configuration should be done by using a network load balancer. This method involves placing a network load balancer in front of multiple PSM for SSH servers to distribute incoming SSH traffic evenly among them. This setup enhances the availability and scalability of PSM for SSH by ensuring that no single server becomes a bottleneck, thereby improving performance and reliability during high usage scenarios.
How can a platform be configured to work with load-balanced PSMs?
- A . Remove all entries from configured PSM Servers except for the ID of the PSMs with load balancing.
- B . Create a new PSM definition that targets the load balancer IP address and assign to the platform.
- C . Include details of the PSMs with load balancing in the Basic_psm.ini file on each PSM server.
- D . Use the Privilege Cloud Portal to update the Session Management settings for the platform in the Master Policy.
B
Explanation:
To configure a platform to work with load-balanced Privileged Session Managers (PSMs), you should:
Create a new PSM definition that targets the load balancer IP address and assign it to the platform (Option B). This approach involves configuring the platform settings to direct session traffic through a load balancer that distributes the load across multiple PSM servers. This is effective in environments where high availability and fault tolerance are priorities.
Reference: CyberArk’s setup guidelines for high-availability environments typically recommend configuring platforms to utilize load balancers to ensure continuous availability and optimal distribution of session management tasks.
What must be done to configure the syslog server IP address(es) for SIEM integration? (Choose 2.)
- A . Submit a service request to CyberArk Support.
- B . Update the syslog server IP address through the Privilege Cloud Portal.
- C . Update the DBPARM.ini file with the correct syslog server IP address.
- D . Update the vault.ini file with the correct syslog server IP address.
- E . Configure the Secure Tunnel for SIEM integration.
B, E
Explanation:
To configure the syslog server IP addresses for SIEM integration in a CyberArk Privilege Cloud environment, the following steps are generally required:
Update the syslog server IP address through the Privilege Cloud Portal (Option B): This is typically done via the administrative interface where system logging configurations can be managed. It allows for straightforward integration of external logging tools by specifying the destination syslog server IP.
Configure the Secure Tunnel for SIEM integration (Option E): Establishing a secure tunnel is often necessary for secure and reliable data transmission between the CyberArk Privilege Cloud and the external syslog server, particularly when integrating SIEM systems that require encrypted and secure data pathways.
Reference: CyberArk’s SIEM integration documentation and support articles often discuss these steps as part of setting up comprehensive security and monitoring configurations.
When installing the first CPM within Privilege Cloud using the Connector Management Agent, what should you set the Installation Mode to in the CPM section?
- A . Active
- B . Passive
- C . Default
- D . Primary
A
Explanation:
When installing the first CyberArk Privilege Management (CPM) instance in the Privilege Cloud using the Connector Management Agent, the installation mode should be set to "Active". This configuration sets the CPM to be actively involved in password management and task processing without being in a standby or passive mode.
Here are the step-by-step details:
Download the Connector Management Agent: Obtain the installer from the CyberArk Marketplace or your installation kit.
Run the Installer: Start the setup and select the CPM component to install.
Choose Installation Mode: When prompted, select "Active" as the installation mode. This sets up the CPM as the primary node responsible for handling password management operations.
This setup ensures that the CPM is immediately active and capable of handling requests without waiting for manual intervention or failover.
Reference: CyberArk’s official documentation provides guidance on setting up the CPM, where it specifies the modes and their purposes.
In the directory lookup order, which directory service is always looked up first for the CyberArk Privilege Cloud solution?
- A . Active Directory
- B . LDAP
- C . Federated Directory
- D . CyberArk Cloud Directory
D
Explanation:
In the directory lookup order for the CyberArk Privilege Cloud solution, the "CyberArk Cloud Directory" is always looked up first. This directory service is a part of the CyberArk Privilege Cloud infrastructure and is specifically designed to handle identity and access management within the cloud environment efficiently. It prioritizes the CyberArk Cloud Directory for authentication and identity resolution before consulting any external directory services.
Reference: CyberArk’s architectural documentation usually emphasizes the role of the CyberArk Cloud Directory in managing and authenticating user access in cloud-based deployments, highlighting its precedence in the directory lookup process.
On the CPM, you want to verify if DEP is disabled for the required executables According to best practices, which executables should be listed? (Choose 2.)
- A . Telnet.exe
- B . Plink.exe
- C . putty.exe
- D . mstsc.exe
B, C
Explanation:
On the Central Policy Manager (CPM), it is crucial to verify that Data Execution Prevention (DEP) is disabled for specific executables required for proper operation according to best practices.
The relevant executables include:
Plink.exe (Option B): This executable is commonly used for SSH communications and may require DEP to be disabled to function correctly under certain configurations.
putty.exe (Option C): Similar to Plink.exe, Putty is another essential tool for SSH communications and might also require DEP to be disabled to prevent any execution issues.
Reference: CyberArk’s best practices for system configuration often highlight the need to adjust DEP settings for certain executables to ensure they run without interruption, particularly when these tools are crucial for secure communications and operations management.
What is the default username for the PSM for SSH maintenance user?
- A . proxymng
- B . psmp_maintenance
- C . psmpmaintenanceuser
- D . proxyusr
B
Explanation:
The default username for the Privileged Session Manager (PSM) for SSH maintenance user in CyberArk Privilege Cloud is psmp_maintenance. This account is used for maintenance purposes and is integral for administrative tasks and configurations related to SSH sessions managed by the PSM. The username is predefined and standardized across deployments to maintain consistency and ensure security best practices are adhered to. The username is mentioned in the CyberArk official documentation regarding PSM configuration for SSH.
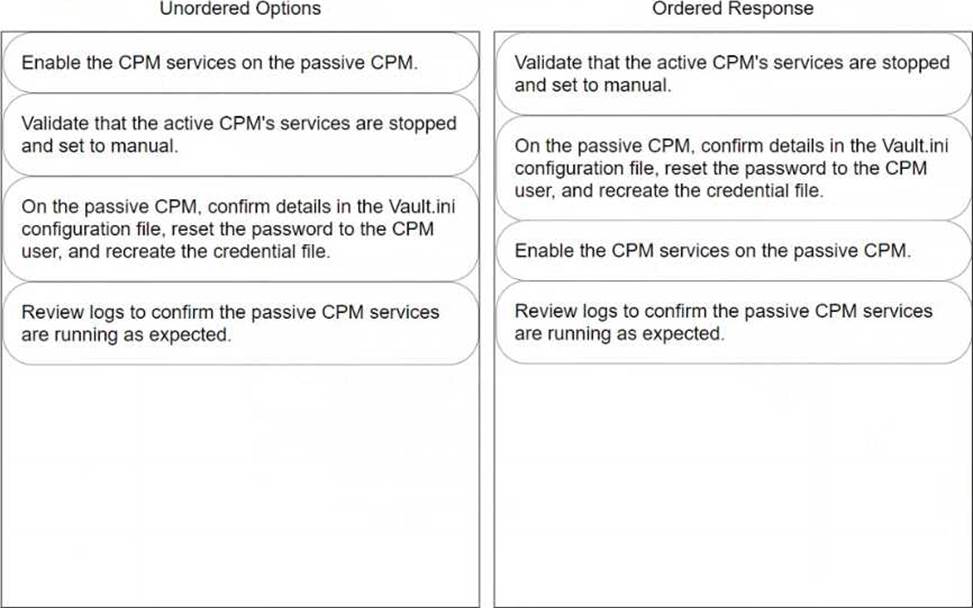
DRAG DROP
Arrange the steps to failover to the passive CPM in the correct sequence.
Explanation:
To properly arrange the steps for failing over to a passive Central Policy Manager (CPM) in CyberArk, the sequence should be as follows:
Validate that the active CPM’s services are stopped and set to manual.
Before enabling the passive CPM, ensure that the services on the active CPM are stopped. This prevents any conflicts or data corruption by making sure that only one CPM is active at a time. Setting the services to manual ensures they do not restart automatically, which is crucial during a failover scenario.
On the passive CPM, confirm details in the Vault.ini configuration file, reset the password to the CPM user, and recreate the credential file.
This step involves making sure the passive CPM has the correct configuration to seamlessly take over operations. Adjustments in the Vault.ini file may be necessary to ensure it is pointing to the correct Vault and network settings. Resetting the password and recreating the credential file are critical to secure the login and authentication process for the newly active CPM.
Enable the CPM services on the passive CPM.
Once the passive CPM is correctly configured and ready, enable its services to begin handling the tasks and responsibilities of the primary CPM. This action effectively switches the role from passive to active, enabling the passive CPM to function as the new operational manager.
Review logs to confirm the passive CPM services are running as expected.
Finally, review the system and application logs to confirm that the now-active CPM is operating correctly and that all services have started without errors. This step is vital for verifying that the failover process was successful and that the system is stable.
Following this ordered sequence ensures a smooth transition of roles from the active CPM to the passive CPM, minimizing downtime and potential disruptions in the privileged access management operations.
On Privilege Cloud, what can you use to update users’ Permissions on Safes? (Choose 2.)
- A . Privilege Cloud Portal
- B . PrivateArk Client
- C . REST API
- D . PACLI
- E . PTA
A, C
Explanation:
On CyberArk Privilege Cloud, updating users’ permissions on safes can be done through the Privilege Cloud Portal and the REST API. The Privilege Cloud Portal provides a user-friendly graphical interface where administrators can manage user permissions directly within the portal’s safe management settings. Additionally, the REST API offers a programmable way to automate permission updates across safes, which is especially useful for bulk changes or integrating with other management tools. Both methods provide effective means to manage and customize access controls in a CyberArk environment, allowing for detailed permission settings per user on specific safes.